
![linux-fu:-reading-your-memory’s-memory-[hackaday]](https://i0.wp.com/upmytech.com/wp-content/uploads/2023/04/119530-linux-fu-reading-your-memorys-memory-hackaday-scaled.jpg?resize=800%2C445&ssl=1)
Linux Fu: Reading Your Memory’s Memory [Hackaday]

Linux users have a lot of software to be proud of. However, there is the occasional Windows program that does something you’d really like to do and it just won’t run. This is especially true of low-level system programs. If you want to poke around your CPU and memory, for example, there are tons of programs for that under Windows. There are a few for Linux, but they aren’t always as complete or handy. Recently, I had half the memory in my main desktop fail and I wanted to poke around in the system. In particular, I wanted to read the information encoded in the memory chips configuration EEPROM. Should be easy, right? You’d think.
Not Really Easy
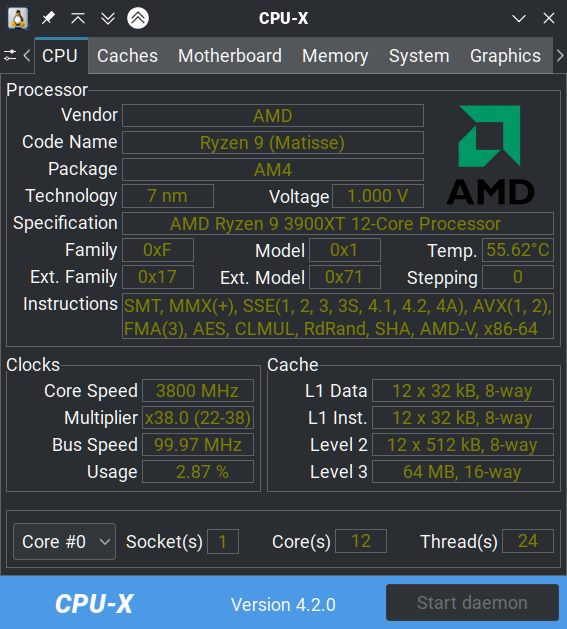
One nice tool a lot of Windows users have is CPU-Z. Of course, it doesn’t run on Linux, but there is a really nice imitator called CPU-X. You can probably install it from your repositories. However, the GitHub page is a nice stop if for no other reason than to enjoy the user name [TheTumultuousUnicornOfDarkness]. The program has a gtk or an ncurses interface. You don’t need to run it as root, but if you press the “start daemon” button and authenticate, you can see some extra information, including a tab for memory.
Don’t get excited. It doesn’t read the EEPROM information, so it failed for me, but it’s still a nice tool. What it does, though, is tells you what the current speed of the RAM is along with the vendor. It also shows you lots of other things, including some benchmarks for your cache and your computer.

So What Do We Want?
A modern stick of DRAM has a little EEPROM on it that the CPU can read via I2C. This is the “serial presence detect” or SPD memory. Each generation of DRAM has a slightly different layout, but in general, it lets the CPU adjust itself to the memory’s speed and any other strange requirements it might have. In addition, there is extra room in there, and Intel defined an area to store enhanced parameters if you want to ask the RAM to go faster than it is rated. Most AMD motherboards can also read that information — the XMP profile — and use it. AMD also has a similar technology called AMP and, for DDR5, EXPO, which all have the same purpose.
Among the information that should be in the SPD is the RAM chip vendor and the “rank” of the memory: that is, does it use one set of chips or two. Of course, Linux can read I2C, so no problem, right?
Next Try
Of course. There’s even a nice tool called decode-dimms that should do the trick for us. If you run it, there is a pretty good bet that you will get an error saying you need to load at24, eeprom, or ee1004 drivers. The at24 drivers are generic, and if you try ee1004, it won’t help yet, anyway. So you dutifully load eeprom using:
sudo modprobe eeprom
Running decode-dimms now works. Kind of. For DDR4 DRAM (and probably others), it will complain that the EEPROM device is the wrong size and you should have used ee1004. That’s nice, but it doesn’t seem to work. Perhaps you need both? Nope. In fact, if you load eeprom, it will grab up the SPD devices and ee1004 won’t be able to find them. If you have eeprom loaded (lsmod can tell you), you need to unload it:
sudo modprobe -r eeprom
sudo modprobe ee1004
Finding SPD
The real issue is that ee1004 doesn’t know how to find the SPD by itself. You’ll have to help. The first thing you need to do is find the SMBus adapters on your motherboard. You may have more than one (I do). Here’s how to do it:
i2cdetect -l

i2c-0   smbus           SMBus PIIX4 adapter port 0 at 0b00      SMBus adapter
i2c-1   smbus           SMBus PIIX4 adapter port 2 at 0b00      SMBus adapter
i2c-2   smbus           SMBus PIIX4 adapter port 1 at 0b20      SMBus adapter
i2c-3   i2c             NVIDIA GPU I2C adapter                  I2C adapter
i2c-4   i2c             NVIDIA i2c adapter 1 at b:00.0          I2C adapter
i2c-5   i2c             NVIDIA i2c adapter 3 at b:00.0          I2C adapter
i2c-6   i2c             NVIDIA i2c adapter 4 at b:00.0          I2C adapter
i2c-7   i2c             NVIDIA i2c adapter 5 at b:00.0          I2C adapter
i2c-8   i2c             NVIDIA i2c adapter 6 at b:00.0          I2C adapter
Your list will be, of course, different. I have three different SMBus adapters, and the SPD for each device will be in the range of 0x50 to 0x57. So we can do a little hunting (I am using -y 0, because I want to look at i2c-0):
i2cdetect -y 0 0x50 0x70

0  1  2  3  4  5  6  7  8  9  a  b  c  d  e  f
00:
10:
20:
30:
40:
50: -- -- 52 53 -- -- -- --
60:
70:
A few notes. If you don’t see any numbers here, try the other busses (in my case, -y 1 and -y 2). If you see “UU” instead of a number, then there is a device there already in use. You probably forgot to unload eeprom or it refused to unload. You’ll need to fix that before you go much further.
By the way, I’m assuming you have the base i2c drivers loaded, and you probably do. If not, you may need to load something like i2c-amd-mp2-pci or i2c-i801. It all depends on your motherboard. Try an lsmod to see what looks like i2c-something-something. You can also do shell completion on modprobe if you have that setup or search your /lib/modules directory for things that start with i2c.
Back to ee1004
If you don’t have ee1004 loaded, this is the time to ensure it is there. It won’t hurt to load it twice, but if that bothers you, use lsmod. If it isn’t there or you just want to be sure:
sudo modprobe ee1004
Of course, if you don’t have this, then you need a new kernel, or you need to build the module. Both of those things are beyond what I want to talk about here, but if you have a newish kernel from a major distro, you should be fine.
The next step is to create the devices using the numbers i2cdetect gave you on the bus you found. So in my case, I need i2c-0 0x52 and 0x53. Remember, half of my RAM is missing, so that’s why there are two devices. You may have four, and your numbers may be different. Don’t just assume my numbers are your number.
To create a new device, we need to write into the /sys directory. When you use sudo, your redirections don’t get root privilege, so you have to do it another way. Personally, I just use sudo -i to start a root shell, but you can use sudo tee if you like:
# This is one way if you are already root
echo ee1004 0x52 >/sys/bus/i2c/devices/i2c-0/new-device
# If you aren't root, try this:
echo ee1004 0x53 | sudo tee /sys/bus/i2c/devices/i2c-0/new-device
Once you’ve made all the devices, probably either two or four unless you have an odd number of memory sticks, you are ready to dump the EEPROMS. If you mess up, you can remove a device like this, assuming you are root:
echo 0x53 >/sys/bus/i2c/devices/i2c-0/delete-device
Decoding
Now you only have to run the decode-dimms command. The output is a lot, but you can save some space by asking it to do side-by-side mode. You can also ask it to output HTML (-f) if you want to look at it nicely formated in a browser. There is a lot of output, but this is the start:
decode-dimms --side-by-side

Memory Serial Presence Detect Decoder
By Philip Edelbrock, Christian Zuckschwerdt, Burkart Lingner,
Jean Delvare, Trent Piepho and others

Decoding EEPROM                                  0-0052           0-0053
Guessing DIMM is in                              bank 3           bank 4
Kernel driver used                               ee1004

---=== SPD EEPROM Information ===---
EEPROM CRC of bytes 0-125                        OK (0xFE45)
# of bytes written to SDRAM EEPROM               384
Total number of bytes in EEPROM                  512
Fundamental Memory type                          DDR4 SDRAM
SPD Revision                                     1.1
Module Type                                      UDIMM
EEPROM CRC of bytes 128-253                      OK (0xDF74)

---=== Memory Characteristics ===---
Maximum module speed                             2400 MT/s (PC4-19200)
Size                                             16384 MB
Banks x Rows x Columns x Bits                    16 x 16 x 10 x 64
...
XMP Profiles
Unfortunately, this still doesn’t read the XMP profile. However, you can easily dump a hex dump of the EEPROM. If you want a raw dump try:
dd if=/sys/bus/i2c/drivers/ee1004/0-0052/eeprom out=/tmp/dump.bin # bus 0, device 52 for me
If you want a hex dump, try:
hexdump -C /sys/bus/i2c/drivers/ee1004/0-0052/eeprom # or use xxd, od, etc.
Note that the Wikipedia page on SPD shows the XMP offset for DDR3 RAM. If you have something else, the offset will differ, but you should still find the header magic number. For my DDR4, it is at location 0x180, for example.
You can pick it apart for the hex or here’s an idea: write a decoder and put it on GitHub. Sure, I thought about it, but this post is long enough already! Luckly, hardinfo — which is a great tool, already has a decoder, but the Ubuntu repository version doesn’t grok ee1004. If you build the version from GitHub, it works just fine. However, you still have to configure the drivers, so it was worth the exercise of getting decode-dimms to work.
Wrap Up

There are a few other tools that will give you some information about your RAM that it gets either from the system or the SPD, including, of course, hardinfo. The lshw utility can tell you a little about your DRAM (try -C memory to limit the output). The dmidecode -t memory command can also display a few things. There are probably more.
It would be nice if the i2c drivers would pick up your memory chips independently. Still, once you have it set up it isn’t that hard, and you may only need to do it once. DDR5 probably has its own wrinkles. If you want to learn way too much about DDR4 memory, there’s a video you should probably watch.