
![linux-fu:-c-on-jupyter-[hackaday]](https://i0.wp.com/upmytech.com/wp-content/uploads/2023/05/123013-linux-fu-c-on-jupyter-hackaday-scaled.jpg?resize=800%2C445&ssl=1)
Linux Fu: C on Jupyter [Hackaday]

If you are a Pythonista or a data scientist, you’ve probably used Jupyter. If you haven’t, it is an interesting way to work with Python by placing it in a Markdown document in a web browser. Part spreadsheet, part web page, part Python program, you create notebooks that can contain data, programs, graphics, and widgets. You can run it locally and attach to it via a local port with a browser or, of course, run it in the cloud if you like. But you don’t have to use Python.
You can, however, use things with Jupyter other than Python with varying degrees of success. If you are brave enough, you can use C. And if you look at this list, you’ll see you can use things ranging from Javascript, APL, Fortran, Bash, Rust, Smalltalk, and even MicroPython.
There are a few reasons I use the term “varying degrees of success.” First, not all of these kernels are official, so you never know how old some of them are until you try them. But what’s more, Jupyter works better with scripting-type languages that can run little snippets without a lot of effort. Not all of these languages fit that description. One of the worst offenders in this department is C. So naturally, I decided I wanted a C-language notebook. This is the story of how that went.
Why?
You may have many reasons for using C from a notebook. Maybe you are more adept at C than Python, and you are in a hurry. Perhaps you have some strange and wonderful library that really doesn’t want to work with Python.
You can modify those arguments to fit any of the languages you can use. However, as usual, we don’t have to figure out why to want to know how to do something. I will, however, show you a bit later that there are other options to use both Python and C in the same notebook — sort of. But first, let’s look at the actual kernel.
How?
Under Linux, at least, you have a few choices about installing Juypter. Using the repo is often unsatisfying because things aren’t there or are out of date. But if you install using the normal methods, it tends to stomp over other things you may use that have Python requirements. Ideally, this wouldn’t be the case, and sometimes everything works out, but I can tell you what has worked for me.
The first thing I do is load Anaconda, which allows you to set virtual Python environments easily. In fact, it starts with a base environment. Then I promptly turn that environment off by default. When I want to work with something like Juypter, I turn on that environment, but for normal day-to-day work, I just leave it turned off.
To do that, follow the instructions from the Anaconda website. I suggest not using sudo to install. Everything will install fine locally for your user, and there’s less chance of screwing up system software by doing it that way. As part of the installation, you’ll get a change to your .bashrc file that activates everything by default. Or you can tell it not to do that and issue a command like this to turn it on later:
. ~/my-conda-dir/bin/activate
But I just let it add a bit to my .bashrc. You need to start a new shell after you install so it will “take.” Then I immediately issue this command:
conda config --set auto_activate_base False
This won’t work if you didn’t start a new shell, by the way, so if you get an error, that’s a likely culprit. Now when you want to use the Anaconda environment for something like Jupyter, you can simply enter:
conda activate base
Obviously, if you make up different environments later, you would activate them instead. The default install has Jupyter and a lot of other things, too. However, if you want to do exotic kernels, you have some more installing to do.
For C, you want to ensure the conda environment is activated (presumably base, as I showed above). Then do the following commands:
pip install jupyter-c-kernel
install_c_kernel --user
You might get a warning, but if all goes well, you are in business.
In Practice
Run jupyter-notebook, and you’ll see a start-up screen in your browser. Pick New from the right-hand side of the page and select C as the notebook type. That’s all there is to it.
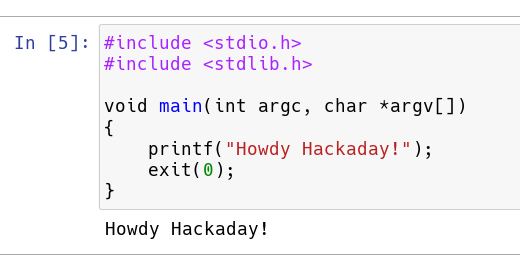
Of course, now, you need to populate a program. Whatever C code you have in a cell stands alone, so you can’t really distribute it around to different cells. It also has to be a complete compilable unit. Here’s a really simple example.
Execute in the usual way (from the menu or Control+Enter).
If you need options sent to the compiler, you can do that with a line at the top of the cell:
//%cflags:-lm
In this case, it passes the -lm option to the compiler so you can use the math library.
Other Ways
If you don’t like working in the browser, some IDEs will let you work in Jupyter notebooks. VS Code, for example, works well. Another option is to keep using the Python kernel, but compile and run your C code via the operating system. This will often even work in cloud environments that don’t support the C kernel. Naturally, too, it will work with just about anything you can do from the command line like C++, awk, or whatever.
The trick is that, when using the Python kernel, you can use a ! to execute shell commands and a %% to specify that a particular cell lives in a file. So consider this notebook from Google Collab:
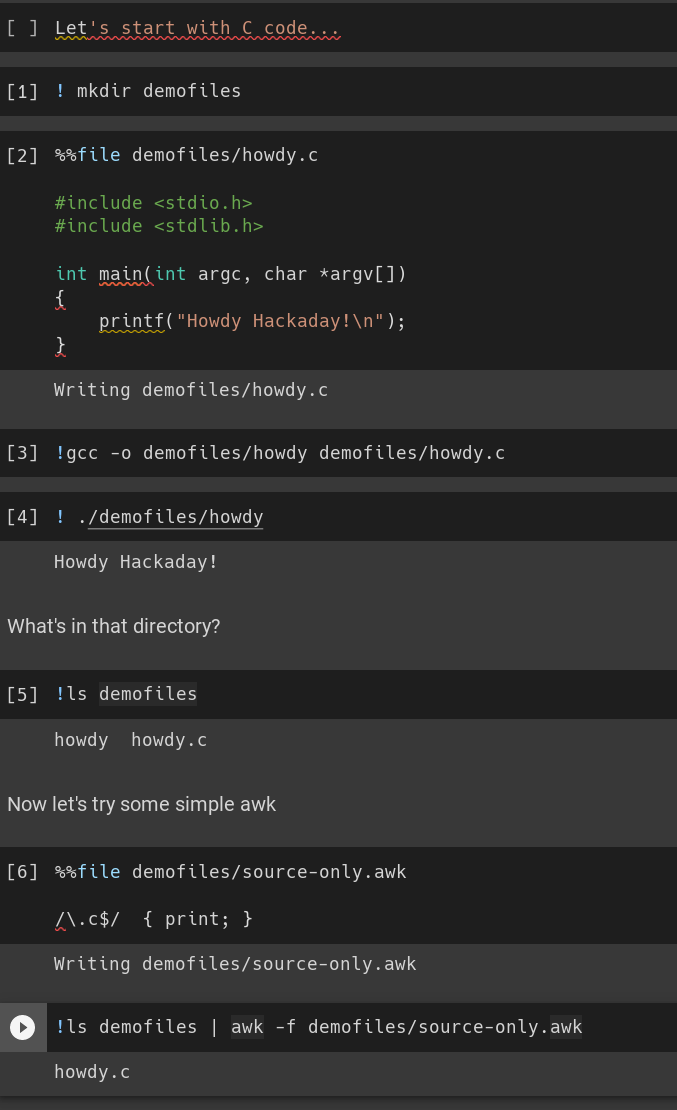
We make a directory, put a C file in it, compile it and run it. Later, we use awk to filter the directory listing. Nothing amazing, but you can see how you could do nearly anything with this method.
Wrap Up
Honestly, if you really want a Jupyter Notebook, C might not be your best choice for a kernel. But it is a choice, and sometimes, you really need to use some odd language from the kernel list. Maybe you have that 50-year-old Fortran code.
We looked at Jupyter, in general, a few years ago. If you prefer Fortran, we got you.