
![3d-printering:-klipper,-the-free-3d-printer-upgrade-[hackaday]](https://i0.wp.com/upmytech.com/wp-content/uploads/2024/08/208534-3d-printering-klipper-the-free-3d-printer-upgrade-hackaday-scaled.jpg?resize=800%2C445&ssl=1)
3D Printering: Klipper, the Free 3D Printer Upgrade [Hackaday]

I have several 3D printers, and I’ve always been satisfied with using either Repetier or Marlin on all of them. There are a few other firmware versions that could run on my hardware, but those two have been all I’ve needed. Sure, it was painful for a while having to juggle features to fit the firmware image onto the smaller microcontroller boards. Now that Marlin supports big 32-bit boards however, that hasn’t been a problem. But recently, I’ve been on a program to switch everything to Klipper.
In this post, I’ll tell you why I did it and give you some data about why you might consider it, too.
The Landscape
Marlin is written in C and burned into a 3D printer’s flash memory. It does a lot. It receives G-code commands, interprets them, and translates them to meaningful actions on the hardware. Modern versions handle automatic transformations to account for lumpy beds, input shaping to reduce shaking, and linear advance to produce better prints.
It might seem simple to control a 3D printer, but there are lots of little details to take into account. For example, if you are moving the head between two XY coordinates and you expect a certain flow rate, then you have to figure out how fast to turn the steppers to get the right amount of plastic out over that time. You also may have to retract before you start a move, make sure temperatures are stable, and transform the actual coordinates based on bed leveling data. There’s a lot going on.
Klipper does the exact same job, but it does it differently. On the 3D printer board is a tiny piece of software that does very little. It’s a bit like a device driver for the printer. All by itself, it does nothing. But it can handle very basic commands that describe how to move the machine.
All the rest of the processing you expect to happen now runs on some Linux computer. That is very often a Raspberry Pi, but it could be a spare laptop, your desktop computer, or anything that will run a reasonable Linux install. Several vendors even sell single-board computers with touchscreens made specifically for running this part of Klipper.
However, even though a screen is nice, you don’t really need it. I’ll talk about that more later.
The Problem
Historically, Klipper was a way to break out of the limitations of using tiny 8-bit controller boards with limited memory. These days, you can get plenty of powerful 3D printer controller boards, so that isn’t as much of an issue as it used to be.
Instead, I have another problem. The build. One of my printers is a custom printer that doesn’t really match any other printer in the world. So, I have to build my own version of Marlin. That’s actually not very hard to do. However, there are two things that are very annoying. First, you have to flash the firmware. The printer uses DFU, and I have brought out the “bootload” switch, but it is still a pain, and I possibly will brick the printer if I make a mistake. A recoverable brick, but still.
But the real problem is keeping my version of Marlin up to date with the official version. The version I have running now is old enough to not have some of the cool features, so I would have to merge the mainline in with my fork. Can it be done? Of course. But it’s awkward, and the longer you wait, the worse it gets.
For a recent 3D printing class I sometimes teach, I picked up two cheap printers that had great support for Klipper, so they were my guinea pigs before I attempted to switch over to the custom printer.
I should note that Klipper, I think, appeals to people who like tweaking settings and editing configuration files. Since you’re reading Hackaday, there’s a good chance that describes you. But if you despise opening a Bash shell and entering text, you might think about avoiding Klipper. While the UIs do a good job of protecting you from most of this, there’s going to be times when you’ll need to get your hands dirty.
Is Klipper the Solution?
You do have to flash a small program over to your board to run Klipper, but once you do it, you very likely will never do it again. If you are dissatisfied, you can flash Marlin back and there’s no harm done. Just make sure you can get your hands on a stock firmware image for your printer before you start making any changes. In my case, I do have the ability to go back to Marlin if I ever wanted to. But at this point, the only reason I’d make the switch back was if I planned on selling the machine to a beginner.
After that one flash, all the other setups for anything you want to do are done through Linux, mostly through a simple configuration file. There are also web-based and touchscreen-based GUIs, but everything is really in a file. The code, too, is mostly in Python, so making a change or adding something is relatively simple, especially if you are comfortable with Linux. The hardware stub and a small part of the host is in C, however.
If you aren’t comfortable with Linux, the user interfaces will help. You can even use them to edit your configuration files in your browser, so it is possible to have no idea how to use Linux and still get by.
Klipper Architecture
I was going to draw a diagram of the Klipper architecture, but [Sineos] beat me to it, so I borrowed this one from the Klipper discourse group’s documentation.
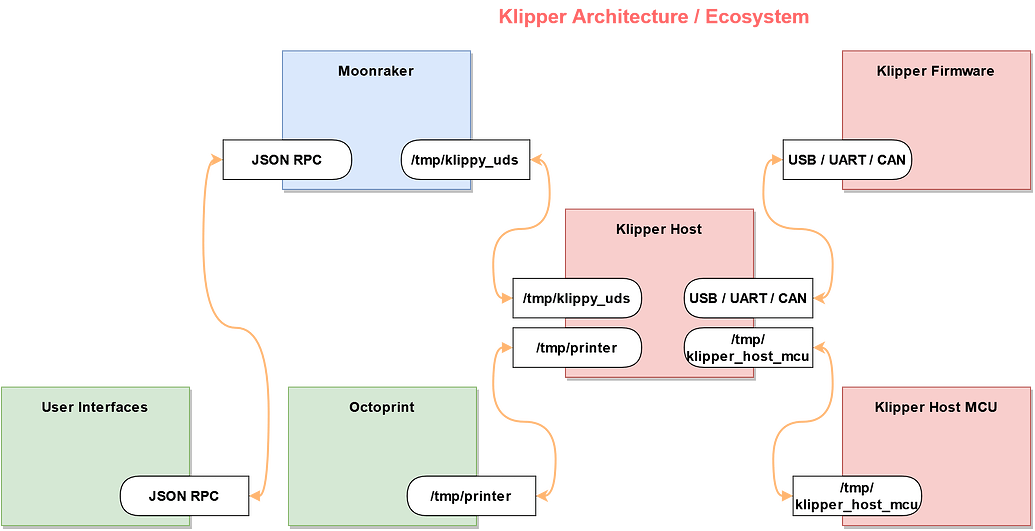
At the top right is the Klipper firmware — that’s the stub that executes basic commands on the hardware. The box on the bottom right indicates that you can even treat the computer Klipper is running on as a hardware host, and — what isn’t shown — is that Klipper can manage multiple controller boards (more on that later).
The final red block is the host, and that’s where all the real processing occurs. It reads G-code and worries about bed level, temperature, and so on. One of the key features is that you control it with macros, which could look like G-code or something else.
Custom G-Code
For example, suppose you want to create a new G-code, say G12345. As far as I know, that’s not a legal G-code. But you can define a macro named G12345 and make it do whatever you want. You can also define macros for real G-codes if you want. So, defining G28 would allow you to take over how the printer homes itself.
You can also have a macro named HACKADAY_LOGO or FILAMENT_CHANGE and stick those in your G code to make Klipper do anything you want. You can even do programming language constructions like for loops and if/then/else in your macros.
Klipper is almost completely concerned with reading input codes and spitting out basic movements. A lot of system management falls to Moonraker, which talks to Klipper for you and communicates with the Web, MQTT, Home Automation, and more. A configuration file is also used to set up Moonraker. So for example, if you want a text message when your print is complete, Moonraker can do that. It also can keep your system up to date.
User Interfaces
It also communicates with user interfaces. For example, if you have a touch screen, it also talks to the system via Moonraker. However, the user interface is usually a web browser viewing pages provided by Fluidd or Mainsail. In fact, you can run both on different ports and use either one you like at any time. The browser doesn’t have to be on the machine you have Klipper on, by the way. In that way, it is like OctoPrint, which you can also use if you like.
OctoPrint has many features but can be heavy to run. For whatever reason, most people seem to run Fluidd or Mainsail, even though it is possible to use OctoPrint and benefit from its many plugins and features. Moonraker can even be made to mimic OctoPrint — so slicers that know how to send jobs to Octoprint can also send jobs to Klipper.
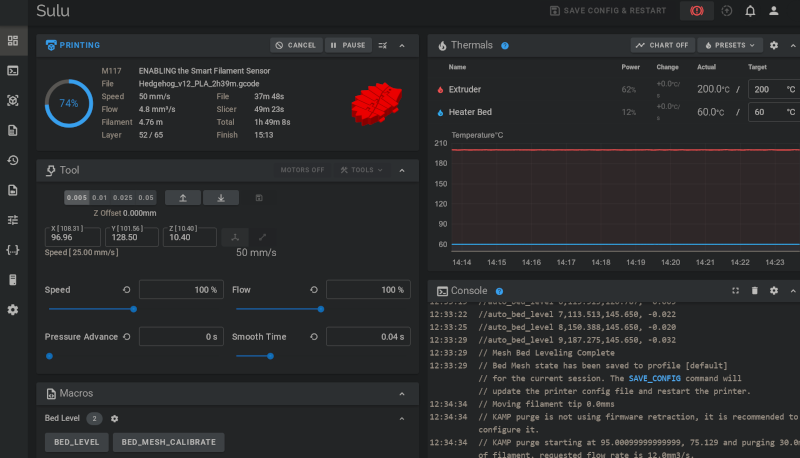
Here’s a look at part of Fluidd’s main page (you can, of course, configure and theme it):
The Next Trick… Juggling!
I mentioned earlier that Klipper can control multiple boards. Some new bed sensors, for example, are their own computers, and Klipper can talk to them directly.
For another example. Suppose you have a board with lots of stepper drivers, and you decide to build a printer with four extruders. Later, you decide you want filament run-out sensors for each one, but your board doesn’t have enough input ports. No problem! Just get a second cheap board, flash it with the stub firmware, and tell Klipper about it. There’s no reason those sensors have to be on the same board as the other electronics. If you are running on a Raspberry Pi, there may be times when you want the Pi to not only run the main Klipper code but also host I/O devices, and that’s the function of that bottom block.
Next Steps
In the next installment, I’ll tell you more about how you can get started and a few things to look out for. If you already use Klipper, let us know your favorite tricks in the comments.
We covered Klipper way back in 2017, and it has come a long way since then. Of course, there are other ways to speed up your 3D prints.